Microsoft Edit provides terminal editing with full mouse and copy-paste support.
???+ note
The current version of Edit (1.2.0) is not available via the package manager apt yet. This could change at some point in the future, making for an easier deployment.
Intel Integrated Graphics (iGPU) is a GPU that is integrated into the CPU. The GPU is a part of the CPU and is used to render graphics. Proxmox may be configured to use iGPU split passthrough to VM to allow the VM to use the iGPU for hardware acceleration for example using video encoding/decoding and Transcoding for series like [Plex][plex-url], [Emby][emby-url] and [Jellyfin][jellyfin-url]. This guide will show you how to configure Proxmox to use iGPU passthrough to VM.
!!! Warning “”
**Your mileage may vary depending on your hardware. The following guide was tested with Intel Gen8 CPU.**
!!! Failure “Supported CPUs”
`iGPU GVT-g Split Passthrough` is supported only on Intel's **5th generation to 10th generation** CPUs!
Known supported CPU families:
- **Broadwell**
- **Skylake**
- **Kaby Lake**
- **Coffee Lake**
- **Comet Lake**
There are two ways to use iGPU passthrough to VM. The first way is to use the Full iGPU Passthrough to VM. The second way is to use the iGPU GVT-g technology which allows as to split the iGPU into two parts. We will be covering the Split iGPU Passthrough. If you want to use the split Full iGPU Passthrough you can find the guide [here][igpu-full-passthrough-url].
The following examples uses SSH connection to the Proxmox server. The editor is nano but feel free to use any other editor.
We will be editing the grub configuration file.
Edit the grub configuration file.
Terminal window
nano/etc/default/grub
Find the line that starts with GRUB_CMDLINE_LINUX_DEFAULT by default they should look like this:
Terminal window
GRUB_CMDLINE_LINUX_DEFAULT="quiet"
We want to allow passthrough and Blacklists known graphics drivers to prevent proxmox from utilizing the iGPU.
Your GRUB_CMDLINE_LINUX_DEFAULT should look like this:
This will blacklist most of the graphics drivers from proxmox. If you have a specific driver you need to use for Proxmox Host you need to remove it from `modprobe.blacklist`
Save and exit the editor.
Update the grub configuration to apply the changes the next time the system boots.
Terminal window
update-grub
Next we need to add vfio modules to allow PCI passthrough.
Edit the /etc/modules file.
Terminal window
nano/etc/modules
Add the following line to the end of the file:
Terminal window
# Modules required for PCI passthrough
vfio
vfio_iommu_type1
vfio_pci
vfio_virqfd
# Modules required for Intel GVT-g Split
kvmgt
Save and exit the editor.
Update configuration changes made in your /etc filesystem
Terminal window
update-initramfs-u-kall
Reboot Proxmox to apply the changes
Verify that IOMMU is enabled
Terminal window
dmesg|grep-eDMAR-eIOMMU
There should be a line that looks like DMAR: IOMMU enabled. If there is no output, something is wrong.
If you have multiple VGA, look for the one that has the Intel in the name.
Here, the PCI address of the iGPU is 00:02.0.
For best performance the VM should be configured the Machine type to ==q35==.
This will allow the VM to utilize PCI-Express passthrough.
Open the web gui and navigate to the Hardware tab of the VM you want to add a vGPU.
Click Add above the device list and then choose PCI Device
Open the Device dropdown and select the iGPU, which you can find using it’s PCI address. This list uses a different format for the PCI addresses id, 00:02.0 is listed as 0000:00:02.0.
Click Mdev Type, You should be presented with a list of the available split passthrough devices choose the better performing one for the vm.
Select ROM-Bar, PCI-Express and then click Add.
The Windows Virtual Machine Proxmox Setting should look like this:
Power on the Windows Virtual Machine.
Open the VM’s Console.
Install the latest version of [Intel’s Graphics Driver][intel-gpu-drivers-url]{target=_blank} or use the [Intel Driver & Support Assistant][intel-driver-and-support-assistant-url]{target=_blank} installer.
If all when well you should see the following output in Device Manager and [GPU-Z][gpu-z-url]{target=_blank}:
That’s it! You should now be able to use the iGPU for hardware acceleration inside the VM and still have proxmox’s output on the screen.
Linux Virtual Machine iGPU Passthrough Configuration
If you have multiple VGA, look for the one that has the Intel in the name.
![Proxmox lspci vga][proxmox-lspci-vga-img]
Here, the PCI address of the iGPU is 00:02.0.
VM should be configured the Machine type to ==i440fx==.
Open the web gui and navigate to the Hardware tab of the VM you want to add a vGPU to.
Click Add above the device list and then choose PCI Device
![Ubuntu VM Add PCI Device][ubuntu-vm-add-pci-device-img]
Open the Device dropdown and select the iGPU, which you can find using it’s PCI address. This list uses a different format for the PCI addresses id, 00:02.0 is listed as 0000:00:02.0.
![Add iGPU MDev to VM][general-add-igpu-mdev-to-vm-img]
Click Mdev Type, You should be presented with a list of the available split passthrough devices choose the better performing one for the vm.
Select ROM-Bar, and then click Add.
The Ubuntu Virtual Machine Proxmox Setting should look like this:
Boot the VM. To test the iGPU passthrough was successful, you can use the following command:
There are many reasons to do this, or to use an application like the one shared here. For example, an application that phones home may need testing for its behavior when it loses connection with an URL, or a system needs to be kept from accessing unsecure sites/services online.
The executable will create a profile called myprofilename inside the hosts file. That is to keep additions separate from the default/manually entered ones already in the hosts file.
This application can be used to perform backups and restores of the hosts file too. More about it can be found in the documentation at: https://guumaster.github.io/hostctl/
Upon connecting the GOG Galaxy client to Ubisoft Connect, it goes into a disconnected state again. This happens just seconds after signing in to the Ubisoft Connect account using the plugin’s login.
???+ note
This seems to be an open issue in the GitHub repo referenced below. A definitive solution has not been found as this method needs to be re-applied from time to time.
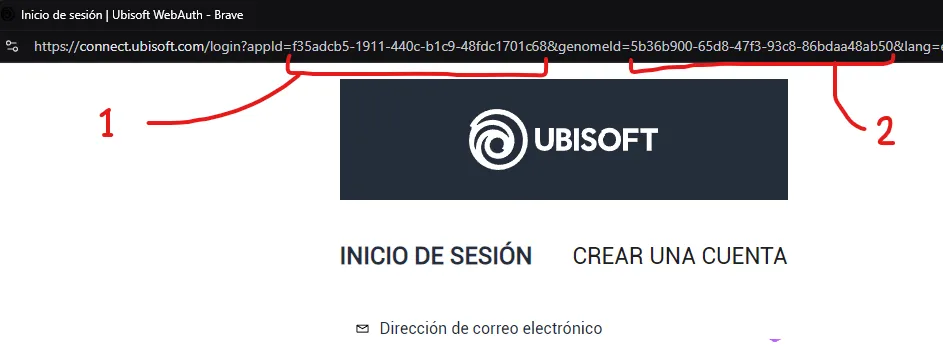 /// caption
Image showing the necessary values to copy from the login URL
///
/// caption
Image showing the necessary values to copy from the login URL
///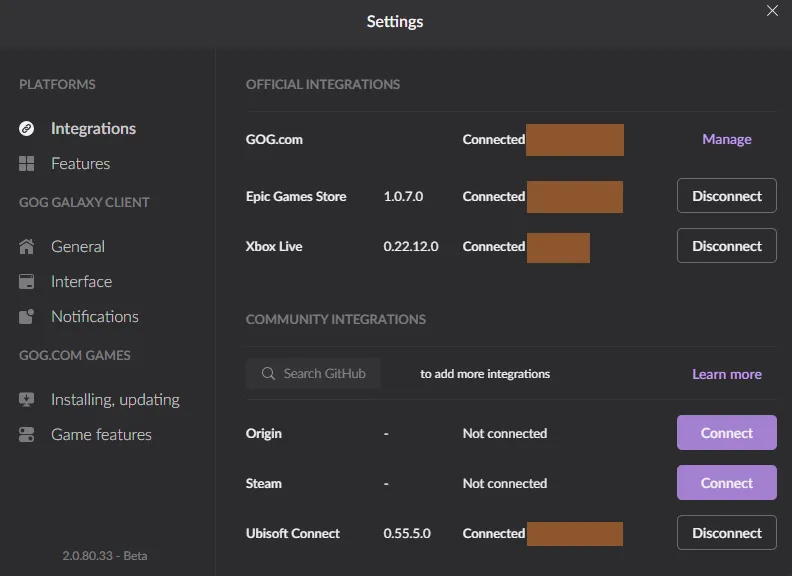 /// caption
Image showing a working connection to Ubisoft Connect after a successful file modification
///
/// caption
Image showing a working connection to Ubisoft Connect after a successful file modification
///