Skip to content

Ismael Lamberty

11 posts by Ismael Lamberty

Installing Microsoft Edit in Debian or Ubuntu based distros

Microsoft Edit provides terminal editing with full mouse and copy-paste support.

???+ note The current version of Edit (1.2.0) is not available via the package manager apt yet. This could change at some point in the future, making for an easier deployment.

Install zstd, needed to decompress the downloaded archive:

Terminal window
sudo apt install zstd

Install the latest Edit version from GitHub for x86_64

Section titled “Install the latest Edit version from GitHub for x86_64”

Download and install the latest release: EDIT_VERSION=$(curl -s “https://api.github.com/repos/microsoft/edit/releases/latest” | grep -Po ‘“tag_name”: “v\K[0-9.]+’) wget -qO edit.tar.zst https://github.com/microsoft/edit/releases/latest/download/edit-$EDIT_VERSION-x86_64-linux-gnu.tar.zst sudo tar xf edit.tar.zst -C /usr/local/bin edit edit –version rm -rf edit.tar.zst

The commands above can be turned into a script for repeat installs.

Install glances and keep it running for showing gethomepage.dev system stats

Install glances and keep it running for showing gethomepage.dev system stats

Section titled “Install glances and keep it running for showing gethomepage.dev system stats”

This guide makes the glances application run in the background on every reboot and provide the necessary metrics for homepage.

Install pip:

Terminal window
sudo apt install python3-pip

Install glances with pip for this user:

Terminal window
pip install --user 'glances[web]'

Re-source the .profile so the glances executable is available in the current environment:

Terminal window
source ~/.profile

Update the crontab to run glances at startup without web UI but able to share system metrics (no web UI to make it more efficient):

Terminal window
# this goes in crontab
@reboot /home/ismael/.local/bin/glances -w --disable-webui

After a reboot, glances runs automatically on every boot. Works well in an LXC container.

Create the services.yaml entry for gethomepage.dev to show server root usage stats:

???+ note Several strings in this YAML need customization. See https://gethomepage.dev/widgets/services/glances/ for the specifics on the Glances widget.

...
- Docker:
- mini-docker:
icon: docker.png
widgets:
- type: glances
url: http://<IP of server>:61208
version: 4 # main version of glances used
metric: fs:/ # showing root usage
...

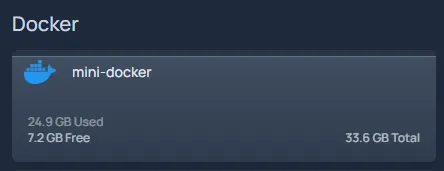
The result should look like this:

mini-docker glances widget

iGPU GVT-g Split Passthrough

iGPU GVT-g Split Passthrough (Intel Integrated Graphics)

Section titled “iGPU GVT-g Split Passthrough (Intel Integrated Graphics)”

Original guide: https://3os.org/infrastructure/proxmox/gpu-passthrough/igpu-split-passthrough/

Intel Integrated Graphics (iGPU) is a GPU that is integrated into the CPU. The GPU is a part of the CPU and is used to render graphics. Proxmox may be configured to use iGPU split passthrough to VM to allow the VM to use the iGPU for hardware acceleration for example using video encoding/decoding and Transcoding for series like [Plex][plex-url], [Emby][emby-url] and [Jellyfin][jellyfin-url]. This guide will show you how to configure Proxmox to use iGPU passthrough to VM.

!!! Warning “”

**Your mileage may vary depending on your hardware. The following guide was tested with Intel Gen8 CPU.**

!!! Failure “Supported CPUs”

`iGPU GVT-g Split Passthrough` is supported only on Intel's **5th generation to 10th generation** CPUs!
Known supported CPU families:
- **Broadwell**
- **Skylake**
- **Kaby Lake**
- **Coffee Lake**
- **Comet Lake**

There are two ways to use iGPU passthrough to VM. The first way is to use the Full iGPU Passthrough to VM. The second way is to use the iGPU GVT-g technology which allows as to split the iGPU into two parts. We will be covering the Split iGPU Passthrough. If you want to use the split Full iGPU Passthrough you can find the guide [here][igpu-full-passthrough-url].

Proxmox Configuration for GVT-g Split Passthrough

Section titled “Proxmox Configuration for GVT-g Split Passthrough”

The following examples uses SSH connection to the Proxmox server. The editor is nano but feel free to use any other editor. We will be editing the grub configuration file.

Edit the grub configuration file.

Terminal window
nano /etc/default/grub

Find the line that starts with GRUB_CMDLINE_LINUX_DEFAULT by default they should look like this:

Terminal window
GRUB_CMDLINE_LINUX_DEFAULT="quiet"

We want to allow passthrough and Blacklists known graphics drivers to prevent proxmox from utilizing the iGPU.

Your GRUB_CMDLINE_LINUX_DEFAULT should look like this:

Terminal window
GRUB_CMDLINE_LINUX_DEFAULT="quiet intel_iommu=on i915.enable_gvt=1 iommu=pt pcie_acs_override=downstream,multifunction video=efifb:off video=vesa:off vfio_iommu_type1.allow_unsafe_interrupts=1 kvm.ignore_msrs=1 modprobe.blacklist=radeon,nouveau,nvidia,nvidiafb,nvidia-gpu"

!!! Note

This will blacklist most of the graphics drivers from proxmox. If you have a specific driver you need to use for Proxmox Host you need to remove it from `modprobe.blacklist`

Save and exit the editor.

Update the grub configuration to apply the changes the next time the system boots.

Terminal window
update-grub

Next we need to add vfio modules to allow PCI passthrough.

Edit the /etc/modules file.

Terminal window
nano /etc/modules

Add the following line to the end of the file:

Terminal window
# Modules required for PCI passthrough
vfio
vfio_iommu_type1
vfio_pci
vfio_virqfd
# Modules required for Intel GVT-g Split
kvmgt

Save and exit the editor.

Update configuration changes made in your /etc filesystem

Terminal window
update-initramfs -u -k all

Reboot Proxmox to apply the changes

Verify that IOMMU is enabled

Terminal window
dmesg | grep -e DMAR -e IOMMU

There should be a line that looks like DMAR: IOMMU enabled. If there is no output, something is wrong.

Terminal window
[0.000000] Warning: PCIe ACS overrides enabled; This may allow non-IOMMU protected peer-to-peer DMA
[0.067203] DMAR: IOMMU enabled
[2.573920] pci 0000:00:00.2: AMD-Vi: IOMMU performance counters supported
[2.580393] pci 0000:00:00.2: AMD-Vi: Found IOMMU cap 0x40
[2.581776] perf/amd_iommu: Detected AMD IOMMU #0 (2 banks, 4 counters/bank).

Windows Virtual Machine iGPU Passthrough Configuration

Section titled “Windows Virtual Machine iGPU Passthrough Configuration”

For better results its recommend to use this [Windows 10/11 Virtual Machine configuration for proxmox][windows-vm-configuration-url].

Find the PCI address of the iGPU.

Terminal window
lspci -nnv | grep VGA

This should result in output similar to this:

Terminal window
00:02.0 VGA compatible controller [0300]: Intel Corporation CometLake-S GT2 [UHD Graphics 630] [8086:3e92] (prog-if 00 [VGA controller])

If you have multiple VGA, look for the one that has the Intel in the name.

Here, the PCI address of the iGPU is 00:02.0.

For best performance the VM should be configured the Machine type to ==q35==.
This will allow the VM to utilize PCI-Express passthrough.

Open the web gui and navigate to the Hardware tab of the VM you want to add a vGPU.
Click Add above the device list and then choose PCI Device

Open the Device dropdown and select the iGPU, which you can find using it’s PCI address. This list uses a different format for the PCI addresses id, 00:02.0 is listed as 0000:00:02.0.

Click Mdev Type, You should be presented with a list of the available split passthrough devices choose the better performing one for the vm.

Select ROM-Bar, PCI-Express and then click Add.

The Windows Virtual Machine Proxmox Setting should look like this:

Power on the Windows Virtual Machine.

Open the VM’s Console. Install the latest version of [Intel’s Graphics Driver][intel-gpu-drivers-url]{target=_blank} or use the [Intel Driver & Support Assistant][intel-driver-and-support-assistant-url]{target=_blank} installer.

If all when well you should see the following output in Device Manager and [GPU-Z][gpu-z-url]{target=_blank}:

That’s it! You should now be able to use the iGPU for hardware acceleration inside the VM and still have proxmox’s output on the screen.

Linux Virtual Machine iGPU Passthrough Configuration

Section titled “Linux Virtual Machine iGPU Passthrough Configuration”

We will be using Ubuntu Server 20.04 LTS for this guide.

From Proxmox Terminal find the PCI address of the iGPU.

Terminal window
lspci -nnv | grep VGA

This should result in output similar to this:

Terminal window
00:02.0 VGA compatible controller [0300]: Intel Corporation CometLake-S GT2 [UHD Graphics 630] [8086:3e92] (prog-if 00 [VGA controller])

If you have multiple VGA, look for the one that has the Intel in the name.

![Proxmox lspci vga][proxmox-lspci-vga-img]

Here, the PCI address of the iGPU is 00:02.0.

VM should be configured the Machine type to ==i440fx==.
Open the web gui and navigate to the Hardware tab of the VM you want to add a vGPU to.
Click Add above the device list and then choose PCI Device

![Ubuntu VM Add PCI Device][ubuntu-vm-add-pci-device-img]

Open the Device dropdown and select the iGPU, which you can find using it’s PCI address. This list uses a different format for the PCI addresses id, 00:02.0 is listed as 0000:00:02.0.

![Add iGPU MDev to VM][general-add-igpu-mdev-to-vm-img]

Click Mdev Type, You should be presented with a list of the available split passthrough devices choose the better performing one for the vm.

Select ROM-Bar, and then click Add.

The Ubuntu Virtual Machine Proxmox Setting should look like this:

Boot the VM. To test the iGPU passthrough was successful, you can use the following command:

Terminal window
sudo lspci -nnv | grep VGA

The output should incliude the Intel iGPU:

Terminal window
00:10.0 VGA compatible controller [0300]: Intel Corporation UHD Graphics 630 (Desktop) [8086:3e92] (prog-if 00 [VGA controller])

Now we need to check if the GPU’s Driver initalization is working.

Terminal window
cd /dev/dri && ls -la

The output should incliude the renderD128

That’s it! You should now be able to use the iGPU for hardware acceleration inside the VM and still have proxmox’s output on the screen.

Dbug Messages - Shows Hardware initialization and errors

Terminal window
dmesg -w

Display PCI devices information

Terminal window
lspci

Display Driver in use for PCI devices

Terminal window
lspci -k

Display IOMMU Groups the PCI devices are assigned to

#!/bin/bash
shopt -s nullglob
for g in $(find /sys/kernel/iommu_groups/* -maxdepth 0 -type d | sort -V); do
echo "IOMMU Group ${g##*/}:"
for d in $g/devices/*; do
echo -e "\t$(lspci -nns ${d##*/})"
done;
done;

Auto-update the Windows hosts file with a hosted list

There are many reasons to do this, or to use an application like the one shared here. For example, an application that phones home may need testing for its behavior when it loses connection with an URL, or a system needs to be kept from accessing unsecure sites/services online.

hostctl’s GitHub page: https://github.com/guumaster/hostctl

Here is a simple example to use this app to update the hosts file with a hosted list on a specific URL.

!!! info inline end “Remember” This application works in multiple OSs. I’m just showing how to use it on Windows as an example.

Domains list Example URL: https://listwebsite.local/list.txt

  1. Put the executable in a directory covered by your PATH variable.
  2. Execute something like the following
hostctl add <myprofilename> -f https://listwebsite.local/list.txt
  1. The executable will create a profile called myprofilename inside the hosts file. That is to keep additions separate from the default/manually entered ones already in the hosts file.

This application can be used to perform backups and restores of the hosts file too. More about it can be found in the documentation at: https://guumaster.github.io/hostctl/

Fixing the GOG Galaxy 2.0 Ubisoft Connect plugin connection

Upon connecting the GOG Galaxy client to Ubisoft Connect, it goes into a disconnected state again. This happens just seconds after signing in to the Ubisoft Connect account using the plugin’s login.

???+ note This seems to be an open issue in the GitHub repo referenced below. A definitive solution has not been found as this method needs to be re-applied from time to time.

A solution shared on a Reddit post applies here:

Not able to connect my ubisoft connect with GoG galaxy
byu/ved7108 ingog

And this is also shared in this GitHub issue:

https://github.com/FriendsOfGalaxy/galaxy-integration-uplay/issues/33#issuecomment-1444362239

The basics are here for reference:

  • Click on the “Connect” button in the Ubisoft Connect integration settings on GOG Galaxy
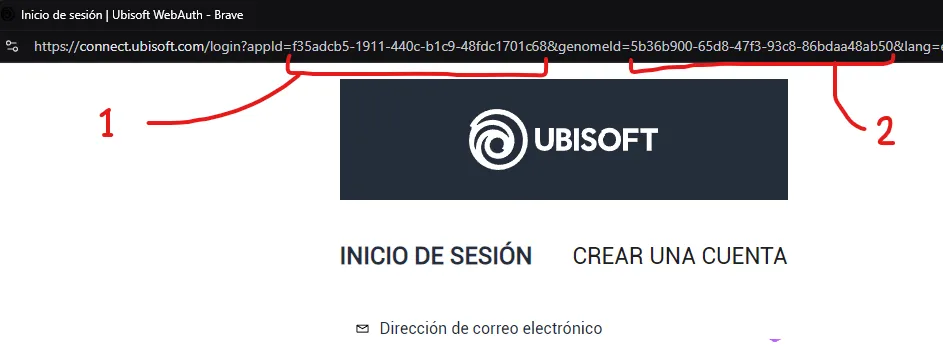
  • Upon getting the screen, copy the (1) appId and (2) genomeId values from the pop-up URL

Ubisoft login screen /// caption Image showing the necessary values to copy from the login URL ///

  • Modify the file %localappdata%\GOG.com\Galaxy\plugins\installed\uplay_afb5a69c-b2ee-4d58-b916-f4cd75d4999a\consts.py
    • If using VSCode, you can just execute in a powershell shell this command
Terminal window
code %localappdata%\GOG.com\Galaxy\plugins\installed\uplay_afb5a69c-b2ee-4d58-b916-f4cd75d4999a\consts.py
  • Find the lines shown below and replace the values with the ones you got from the Ubisoft Connect login screen
CLUB_APPID = "f35adcb5-1911-440c-b1c9-48fdc1701c68"
CLUB_GENOME_ID = "5b36b900-65d8-47f3-93c8-86bdaa48ab50"
  • Save the file and log in on the Ubisoft Connect login screen
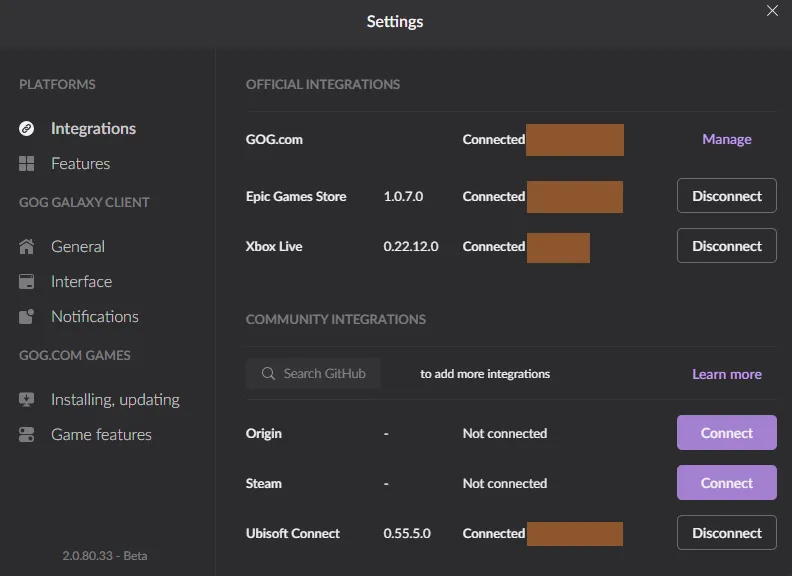
  • The client should now stay connected, as shown below

!!! info inline end “Remember” Remember that this fix, so far, needs to be re-applied if Ubisoft changes the values on their side

GOG Galaxy Integration Settings /// caption Image showing a working connection to Ubisoft Connect after a successful file modification ///

Run a PowerShell ps1 script hidden from view and scheduled on Task Scheduler for Windows

PowerShell scripts run in a visible window by default. To run one completely hidden, launch it through a .vbs script executed by wscript.

Set up the scheduled task like this:

  • In Task Scheduler
    • Action: Start a program
    • Program/script: wscript
    • Add arguments (optional): <path\to\the\.vbs\file>

The .vbs launcher script:

command = "powershell.exe -ExecutionPolicy Bypass C:\path\to\script.ps1"
set shell = CreateObject("WScript.Shell")
shell.Run command,0

Mount an SMB share and use iGPU on an unprivileged Debian 12 LXC container in Proxmox

Prerequisites:

Create an unprivileged Debian 12 LXC container.

Inside the LXC container, use the root user to create a non-root user. In this example the user is added to the sudo and docker groups after installing Docker inside the LXC container.

Terminal window
useradd -s /bin/bash -m -G sudo,docker ismael

Change the user password as needed.

Terminal window
su ismael
passwd

This user’s default UID:GID will be 1000:1000. If not, create it with:

Terminal window
useradd ismael -u 1000 -g 1000 -m -s /bin/bash -G sudo,docker

Take note of this UID:GID as it will be used to map the share in Proxmox. The share itself can live on another system; here an unRAID VM on the same host is used.

Create a user that can be mapped from the host to the LXC container. Without this step, the share ends up read-only inside the LXC container.

Proxmox maps the users and groups from the host to the LXC containers starting at UID:GID=100000:100000.

The created ismael user then:

  • Inside the LXC container UID: 1000
  • Inside the host UID: 101000

Create a group on the host with GID=101000 that will own the directory created for the SMB share

Terminal window
groupadd -g 101000 ismael

Create the same user that will be used inside the LXC container but with the right UID:GID combination

Terminal window
useradd ismael -u 101000 -g 101000 -m -s /bin/bash

Make a directory for the share

Terminal window
mkdir /mnt/media

Change the directory’s owner to the previously created user

Terminal window
chown ismael:ismael /mnt/media

Modify the /etc/fstab file to mount the SMB share on the directory we created

Terminal window
nano /etc/fstab

Copy this line inside the nano editor for /etc/fstab (note the guest part, as this SMB share has no password set)

Terminal window
//192.168.0.10/media /mnt/media cifs guest,rw,uid=1000,gid=1000,file_mode=0777,dir_mode=0777 0 0

For shares that require a password:

Terminal window
//192.168.0.10/media /mnt/media cifs username=<username>,password=<password>,rw,uid=1000,gid=1000,file_mode=0777,dir_mode=0777 0 0

Reload the changes to /etc/fstab before mounting

Terminal window
systemctl daemon-reload
mount -a

Create a mountpoint in your LXC container pointing to the created share directory

Terminal window
pct set 104 -mp0 /mnt/media,mp=/mnt/user/media

Start the LXC container and the share is mounted in /mnt/user/media, writable by the mapped user.

Coming soon…

Proxmox | automatically restore SMB/CIFS share connections

If at some point Proxmox loses connectivity with an SMB/CIFS share, it will not restore the connection by itself until a restart of the Proxmox node is performed. With the script below, the Proxmox node restores the connection automatically.

On the node’s shell, create a bash script that looks for mount points in /mnt/pve/ and unmounts them if they become stale:

Terminal window
nano remount.sh

Put this content into the file:

#!/bin/bash
list=$(ls /mnt/pve)
for i in $list
do
status=$(ls /mnt/pve/$i 2>&1)
if [[ $status =~ .*Stale.* ]]
then
umount /mnt/pve/$i
fi
done

Remember to make the script executable by the user creating it:

Terminal window
chmod 766 /root/remount.sh

Add a cron job for this script to run automatically:

Terminal window
* * * * * /root/remount.sh >/dev/null 2>&1

With that, any SMB/CIFS connections are restored automatically. That is because the service pvestatd tries to remount every SMB share every 10 seconds.

This approach could work for NFS shares too, but that possibility has not been tested.

Set up your SSH key-based authentication from Windows in a single line

Linux-to-Linux SSH setups are straightforward, but the Windows OpenSSH client needs a different approach to copy a generated key for password-less logins.

Generate your private and public keys in your Windows PowerShell shell

Section titled “Generate your private and public keys in your Windows PowerShell shell”

Execute the command below in Windows Terminal or any other terminal in Windows:

Terminal window
ssh-keygen

This generates the keys in the local host’s Windows profile directory under the .ssh/ sub-directory.

You can access it in this location on Windows by using the key combination Win + R and then entering this text in the Run window:

Terminal window
%userprofile%/.ssh/

That directory will include:

  • your generated private key id_rsa
  • your generated public key id_rsa.pub

The public key is the one we’ll copy into any remote host we want to connect without using a password.

The command below performs the equivalent of ssh-copy-id using the OpenSSH client on Windows. Edit user@host.address with the remote user and host IP/hostname.

Terminal window
type .ssh\id_rsa.pub | ssh user@host.address "mkdir -p .ssh && cat >> .ssh/authorized_keys"

This makes it possible to login directly to your remote host by simply using:

Terminal window
ssh user@host

Password-less login is now available:

SSH tunneling for access to web-based apps on servers

SSH local port forwarding exposes a web UI from a remote server on the local machine. This is useful for tools such as Portainer running on a cloud VM.

Run this command on the local machine:

Terminal window
ssh -L 9000:127.0.0.1:9000 my_user@my-remote-server

This forwards the remote port 9000 to the local machine:
http://localhost:9000 or http://127.0.0.1:9000

At this local address, the Portainer web UI from the remote server is available.